
getting started
Full Dashboard Walkthrough.
This walkthrough covers all the essentials.
CLICK BELOW TO WATCH FIRST!
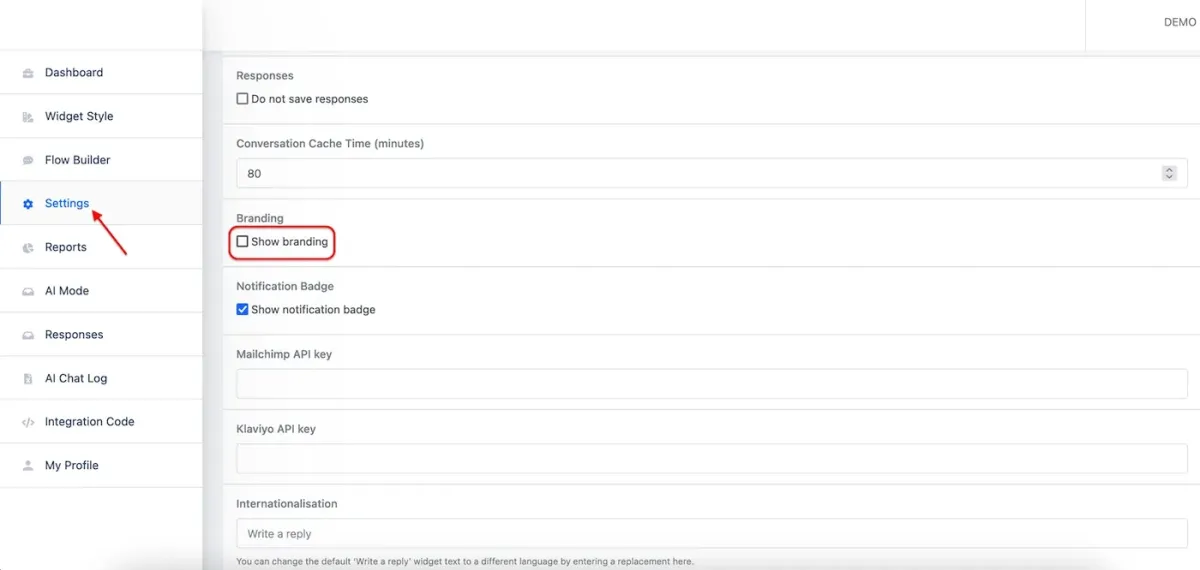
Removing ‘Powered By’ Branding
You can remove the “Powered By” logo and link in any bot to hide any mention of our brand.
Load any bot in your account, and in the left sidebar choose “Settings”.
Then, scroll down to “Powered By” branding.
Uncheck the "Powered By" option to remove any mention of our branding.
AI Mode Overview
This walkthrough covers all of the AI mode essentials.
CLICK BELOW TO WATCH FIRST!
How to install your bot.
This guide is for the standard widgets. For the in-line bot widget, see the bottom of this article.
Select a bot from your dashboardNavigate to the“Integration Code”sidebar menuCopy the Universal Integration Code (unless you are using GoHighLevel or Groove - in that case, copy the GoHighLevel integration code instead)Paste the integration code before the </body> tag in whichever platform you are using, or in the scripts section of the website platform, usually referred to as footer scripts or body scripts
(see below for tips on how to do this for different platforms, but you can always just Google “how to install custom scripts on <platform name>”)
💡 If you have any issues with your bot not appearing, see
this troubleshooting article
for all of the possible scenarios this can happen, along with the fixes.
CLICK BELOW TO WATCH FIRST!
How to Demonstrate bots for clients?
How to demonstrate bots for clients
When you need to share your bots with clients for demonstration purposes, there are three simple methods you can use:
💡
Pro Tip:
Showcase your chatbots to multiple clients with a custom-branded page on your domain.
Method 1: Using a custom branded demo page
The easiest way to showcase your chatbots to clients is using your own custom branded demo website.
Recommended options:
Standard widget demo:
Showcase your bot to your potential clients using the "good ol' reliable" website widget. Create unlimited subpages and showcase to multiple clients. Just copy and paste your script and you're good to go!
Inline embed demo:
Showcase the inline embed option. Replace a clients contact form and drive even more conversion with embedable chatbots.
Fullscreen demo:
Showcase your bot in fullscreen. Fullscreen bots work great as dedicated support centers and at creating your own custom ChatGPT.
IFrame demo:
Display your chatbot directly on your clients website using iframe.
🚧 Note: Iframe demos only support HTTPS websites. Some websites with strict security policies cannot be displayed in an iframe.
Method 2: Create an additional page on your website
You can embed the bot on a website that you control.
Create a Separate Page for the Bot: Set up a new page dedicated to the bot demo on your website?
No Site? Try Framer. Framer is a great tool for this purpose, offering a free plan that includes a subdomain.
🚧
Important:
If you’re using your own website, display the demo chatbots only on specific pages to avoid script conflicts. It’s best to create a dedicated demo page specifically for showcasing your clients’ chatbots.
Method 3: Recording a Loom video
Another effective way to share your bot is by recording a video demonstration. Here’s how to do it:
Open the Bot in the Editor: Navigate to the bot you want to demo within the editor.
Record with Loom: Use Loom to record a video of yourself demonstrating the bot. Ensure the recording is cropped to focus solely on the bot interface.
Share the Loom Link: Once your video is ready, you can share the Loom link with your clients.
All methods provide a professional and user-friendly way to showcase your bots to clients. Choose the one that best suits your needs and resources.
Can I grant clients access to edit their bot?
Common questions around what clients can/can’t do:
We are not a DIY platform, you build and manage bots on behalf of your clients, as an agency - this is the typical agency model.
As such, there’s no way for clients to get access to your account and edit their bot directly — this is your job as the agency.
You can use email notifications to send leads in real time to your clients (which is accessible in the settings of each bot), or one of our many integrations, such as the Google Sheets integration to get leads to your client in real time… you can even send them directly to their CRM via Zapier, Make, Pabbly, etc. See the Integrations section for more on all of these.
💡
Charging for Subscriptions:
The agency model enables you to charge your clients a subscription fee as a retainer for your services. You’re offering a custom-built AI solution that includes all OpenAI token costs, as well as support and management. This means clients are paying not for software, but for a dedicated chatbot manager/developer. You can also bundle your chatbot services with other offerings to increase your retainer, such as managing their integrations and automations.
Building Your First Bot
Build a bot.
This walkthrough covers all of the flow builder essentials.
CLICK BELOW TO WATCH FIRST!
Troubleshooting 🛠️
My bot is not appearing, or disappears.
My bot isn’t appearing, or disappears Here are the most common reasons for the bot not appearing or disappearing
Go into the bots settings, and make sure the ‘whitelist’ is blank/empty for testing, just incase that is the cause of the issue (this is the most common cause, it’s very sensitive)
Verify the code is installed correctly on your site. Right click your site, click “View Page Source” in the right click menu, and then ctrl+F (Windows) or cmd+F (Mac) search the source code for the script. If nothing is found, the code is not installed. The code should be ideally installed before the tag on your site, but installing in the header may also work if this isn’t an option.
If the code IS installed (you’ve found it in step 2 above) but you still don’t see the bot and you’re using a custom HTML site (not a website builder/platform), add this code to your header section, right after the element:
If the code IS installed but you’re using GHL or Groove and it’s disappearing, make sure you’re using the GHL-specific integration code from the Integration Code tab in settings, below the Universal integration code
If you’re using WordPress, the most common reason for the bot not to appear is due to a caching or optimization plugin - examples include WPRocket, SiteGround, etc. You must go into the relevant plugin and disable all Javascript related functions (JS caching, JS optimization, etc). Disabling the plugin is not enough, as your server will still load the last version. You must go into your optimization plugin and manually disable all JS optimization and caching features. Also ensure you have the bot installed correctly in the first place - you can use the free WPCode plugin to handle this if you’re not sure how.
If you’re using Google Sites or GoDaddy’s website builder, neither of these platforms support custom code injection currently - instead, they embed custom code in a frame, which isn’t compatible with a floating widget, unfortunately. These platforms are intended for small personal projects, not commercial sites. The new inline-embeddable bot MAY work on these sites but is largely untested.
If you’re using a local test environment (aka, testing without uploading your site to an actual server or platform), the bot will not load. It needs to be online, not local.
After making any changes, test in a private browsing window (Incognito mode) to make sure you’re not seeing a cached version of the site
AI Not Responding
Scenario: When using the AI Mode Block in the flow builder, when the chat reaches the AI block, nothing happens, or the user has to ask twice for a response
Answer: Check that the block directly before the AI Mode Block isn’t a “Question” block. It needs to be a normal “Message” block. If you use a Question block before an AI Mode block, a user would have to ask their question twice - once for the question block, and once for the AI Mode block. Therefore, you should just use a normal Message block prior to an AI Mode block.
Getting an OpenAI error message instead? That means OpenAI may be down! Check OpenAI’s status page here. They don’t always update for very small interruptions, or interruptions which have literally just started — but this error is an OpenAI error specifically.
Styling issues (hidden text, wrong colours, etc)
Styling issues are uncommon but can result when styles on your own site conflict with bot styles.
You can fix these by using some custom CSS on your site.
Below are the most common issues. For larger issues, such as those that occur on Shopify, see this dedicated help article with styles for Shopify (may also work on other platforms).
Here is how the code snippet would look like for installation:
<style>
div.talktext p {
color: black !important;
}
</style>
Common issues and the relevant CSS is below:
The text on the Call to Action “speech bubble” pop out is white/hidden, meaning you can’t see it
You can insert this as custom CSS on your site to fix it:
<style>
div.talktext p {
color: black !important;
}
</style>
The area behind the “Powered By” branding/custom logo is grey, black or the wrong color.
You can insert this as custom CSS on your site to fix it:
<style>
#poweredBy {
background-color: white !important;
}
</style>
Chat links wrong color:
You can insert this as custom CSS on your site to fix it:
<style>
.chatLink {
color: blue !important;
}
</style>
Button links wrong color:
You can insert this as custom CSS on your site to fix it:
<style>
.sc-suggestions-element {
color: blue !important;
}
</style>
Font size needs changing:
You can insert this as custom CSS on your site to fix it:
<style>
.sc-message--text-content {
font-size: 18px !important;
}
</style>
Shopify Widget Issues
A small percentage of Shopify themes (a common one is 'Dawn') don't play nicely by default with our bots - the styling of the theme conflicts with the widget, and screws it up (text aligned the wrong way, sometimes not able to type in the chat box, etc). The fix is simple and I'm posting it here for reference...
In your Shopify admin, go to Online Store > Themes.
Click Customize.
Click Theme settings.
Click Custom CSS.
Add your code [the code is below]
Click Save.
Code to add:
<style>
.chat {
text-align: left !important;
}
.sc-user-input--text:focus-visible {
box-shadow: none !important;
}
.sc-user-input--text {
display: block !important;
}
</style>
💡 We've tested this with multiple problematic themes and it has worked in all cases 🙂
AI responses too long
The best way to modify the bot to respond with shorter outputs is within the “prompt” (Business Context/training data) itself. Try ending your prompt in the Business Context section with this:
“Important note: keep your responses short and no longer than 250 characters”
How well it follows the advice depends on the model. By default we use GPT 4o mini.
The “reply length” limit within the AI Mode block is more for limiting token/AI credit usage and can also be set as a "hard limit".
For example if we prompted the ai to respond with anwsers no longer than 225 characters we would then set a hard ai limit to 250 so the AI has some room to fully finish a sentance.
Missing data in Integrations
Data is passed to integrations in 3 scenarios:
When the email block is filled in (unless 2 or 3 below is present)
OR when a ‘Save Data’ block is hit
OR when an AI Mode block is hit (and the timer is reached, set within the block settings)
So if you’re missing fields or blocks, likely you need to add a Save Data block after the data you want collecting, or you could finish with an AI Block instead, which also serves the same purpose.
General issues in the flow builder
This article contains general troubleshooting for issues that arise when using the flow builder (the chat flow editor).
First, you should use a modern, up to date browser such as Google Chrome — this is our recommended browser. Using a modern, up to date browser will fix a lot of issues.
Secondly, simply trying a different browser can fix a lot of issues… which often arise due to a local cache issue.
If your issue is that you’re finding it hard to navigate around a particularly large and complex flow, you can try zooming out in your browser using the “View” toolbar in your browser and then “Zoom Out” several times. Whilst we don’t have a native zoom in/out feature for the flow builder, your browsers own function can be useful for this in the meantime.
We are already working on an improved flowbuilder that makes navigating around larger flows easier.
That said, we highly recommend you keep flows as simple as possible, and use AI blocks to do heavy lifting in your flows.
Also make use of “Loop” blocks to avoid building large flows that use many of the same elements.
For other issues relating to specific functions, see our troubleshooting section of the help desk.
And for a general guide on using the flow builder correctly, see our getting started video here.
Our getting started video shows how to use all of the common block types, and is a must watch to understand how the flow builder and the different blocks work.
integrations
Google Sheet Integration
Google Sheet Integration
We have a native Google Sheets integration. Here’s how to set it up!
CLICK BELOW TO WATCH FIRST!
Reminder: Integrations only work with Flow Builder based bots.
Troubleshooting
If you’re having any issues with the Google Sheets integration, here are the most common reasons for NOT seeing data in Sheets:
Make sure you’re using a flow-based bot. Integrations do not work in the standalone AI Mode. Remember, you can now create AI bots in the flow builder.
Data is passed to integrations when either an email block is hit, a “Save Data” block is hit, or when an “AI Block” is present and the timer for the AI block is hit (you configure the timer in the AI Blocks settings), so be sure one of those scenarios applies. If you’re not using an AI block, consider testing with a Save Data block inserted at the point you wish to push data.
You can verify your integrations are working by seeing if the email notification feature works. Enter an email address in the ‘email notifications’ field in bot settings. Data will be emailed at the same time as any other integration data is sent, so this is an easy way to debug where the issue lies. Worth noting, sometimes custom domains block Mailgun, our notification mail partner, so try testing with a Gmail address or similar if you don’t see notifications with a custom domain.
If you determine the issue lies with Sheets itself, then there’s an issue in the setup. Rewatch the video above closely. Every step must be completed correctly.
The most common issues in the setup are with incorrect permissions being setup so pay close attention to that part. Also, triple check the sheet URL you place in the Google Sheet ID section is the correct one.
If all else fails, try to create a fresh integration with a NEW simple test bot (just collect something like name, email, and then save data) with a NEW Google Sheet, following the steps above again, to see if there is some unusual issue with a particular sheet or bot.
Zapier Integration
Zapier Integration
Learn how to use our Zapier integration.
CLICK BELOW TO WATCH FIRST!
Reminder: Integrations only work with Flow Builder based bots.
Troubleshooting
It's worth keeping in mind that the bot will only send data to any external app, including Zapier, in these 3 circumstances:
At the point in a flow where an email address is collected, OR...
At the point in a flow where the "Save Data" block is placed
Whenever the timer for the AI block is hit, if you have an AI block
Important to note:
if you’re using solo “AI Mode”, integrations do not work in that mode. You need to build your bot in the flow builder for integrations to work. You can still use AI in the flow builder.
For simple bots where you're collecting basic data, simply making sure you collect an email address after collecting other basic data (e.g. name, phone, anything else you want) is all you need to do.
For more complex flows or where you want to collect data after their email address, you need to insert the "Save Data" block after you're done collecting the required information. Once the flow reaches the "Save Data" point, it will push the data to Zapier (or any other app you're connected with).
CLICK BELOW TO WATCH FIRST!
Reminder: Integrations only work with Flow Builder based bots.
Troubleshooting
If you’re having any issues with the Google Sheets integration, here are the most common reasons for NOT seeing data in Sheets:
Make sure you’re using a flow-based bot. Integrations do not work in the standalone AI Mode. Remember, you can now create AI bots in the flow builder.
Data is passed to integrations when either an email block is hit, a “Save Data” block is hit, or when an “AI Block” is present and the timer for the AI block is hit (you configure the timer in the AI Blocks settings), so be sure one of those scenarios applies. If you’re not using an AI block, consider testing with a Save Data block inserted at the point you wish to push data.
You can verify your integrations are working by seeing if the email notification feature works. Enter an email address in the ‘email notifications’ field in bot settings. Data will be emailed at the same time as any other integration data is sent, so this is an easy way to debug where the issue lies. Worth noting, sometimes custom domains block Mailgun, our notification mail partner, so try testing with a Gmail address or similar if you don’t see notifications with a custom domain.
If you determine the issue lies with Sheets itself, then there’s an issue in the setup. Rewatch the video above closely. Every step must be completed correctly.
The most common issues in the setup are with incorrect permissions being setup so pay close attention to that part. Also, triple check the sheet URL you place in the Google Sheet ID section is the correct one.
If all else fails, try to create a fresh integration with a NEW simple test bot (just collect something like name, email, and then save data) with a NEW Google Sheet, following the steps above again, to see if there is some unusual issue with a particular sheet or bot.
Ready to Build your Own AI Chatbot?
Request a demo and get started within 48 hours 🙌